Here are some good examples of a simple still life. We are starting to get more into complex objects and this is a good start. It has some transparent objects, white objects and rounded objects. It is also spaced out enough to practice measuring and working with the clock method. To find an example of how to approach a still life, click on the older post at the bottom of the page.
Wednesday, September 26, 2012
Thursday, September 13, 2012
Thursday, September 6, 2012
Here are some simple examples of perspective. Seeing perspective on paper is a lot different than seeing it in person 3-dimensionally. Just remember to always know where your eye level or horizon line is and that your vanishing points will lie on the eye level.
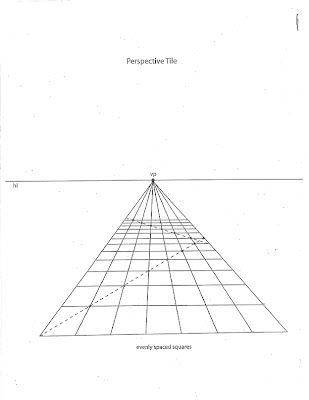
This example shows how you can see perspective by creating a grid. Sometimes it is easier to create your squares so they are 1" apart. This example shows seven, one inch squares. Make sure they all go to the same vanishing point.
Draw a line through the corner of the first square. Where that line meets the next line that goes up to the vanishing point from the second box, draw a second horizontal line. You will find your spacing of your boxes by when the diagonal line meets the lines going to the vanishing point. Notice when the diagonal meets the last line that leads to the vanishing point. Pay attention to where the next diagonal line starts.
This example shows how you can size the boxes as they move farther from the viewer.
Spacing out fence posts are similar to what you can do when drawing something like buildings with columns. For this example,
- Start with the first post, add your next post by where you feel it should be or do so by measuring (it depends on what you are drawing, if it is imagination or drawing from life).
- Draw an X (dotted line) to find the center point
- Now you can draw a line that goes through the middle of the fence to the VP
- Once that is established, now you can draw a horizontal line that goes from the first fence post, through the second to where the middle part of the fence meet. When you reach the line that goes to the VP, you have the start of the 3rd fence post. Now just repeat the latter and go back as far as you need.
Subscribe to:
Comments (Atom)


